Jn2
Full Access Member
- Joined
- Jul 19, 2009
- Posts
- 1,847
- Reaction score
- 1
well lemme know ") ill go take a actual pic of it for you be back in a sec
ill go take a actual pic of it for you be back in a sec
ill go take a actual pic of it for you be back in a sec
 ill go take a actual pic of it for you be back in a sec
Ok here's another update.
I got the wideband bung welded into the LSJ DP.
I figured out the hose routing last night from looking at a ZZP diagram. Don't forget I am using the ZZP H/E so it won't have any small nipple on it for anything. Today I decided to overnight the few items it took to do the stock SC coolant setup... with the small reservoir attached to the SC and the formed hoses from the intake manifold to the SC reservoir and the intake manifold to the IC pump.
It will look more factory now.
Here is the original ZZP diagram I looked at.

Here is the modified diagram of what it will look like without the stock H/E and using only the ZZP H/E.

Also, here is the promised photo of the hex socket plug in the MAP sensor hole in the SC. It was really simple. You can see some teflon tape around it still.


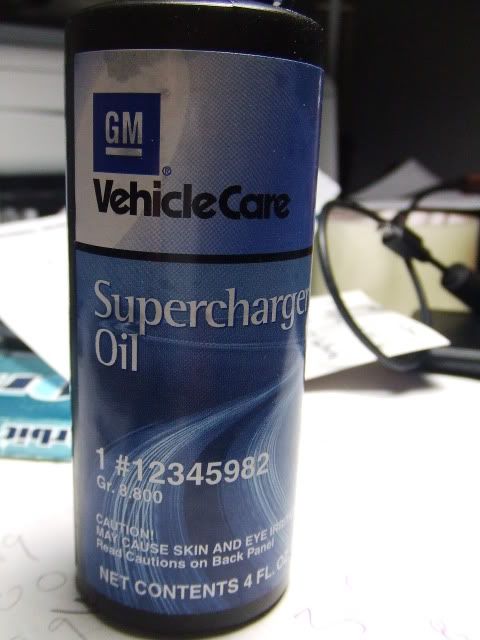
On many howto's for supercharging the 2.2/2.4 or even just the how to for replacing the oil in the m62 I have seen many people say you need 2 bottles of oil which is over 8oz's, this is wrong!...And all the arguing in the "how to change your M62 oil thread" just confused me more...SO straight from Eatons website here we are....Hopefully this will help clear the questions and misinformation..perhaps a sticky?
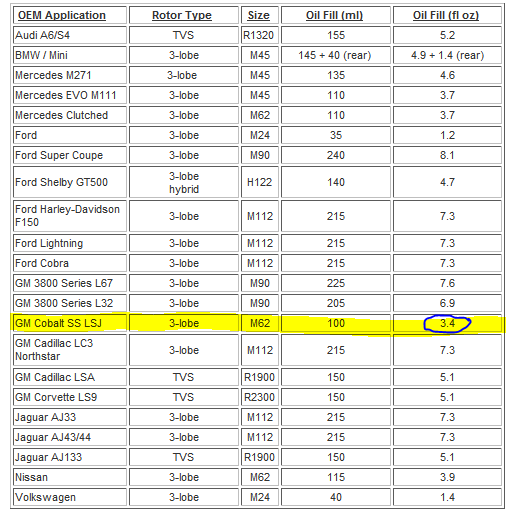
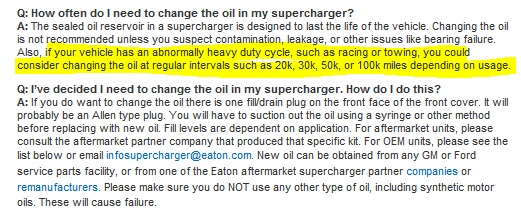
Source:FAQ for Superchargers

 u can distinguish the older one from the new ne bc the older one is smooth up top, the newer one has 3 ridges going thru it vertically...and the bed spread is guyish, better than mine i sleep with a tan cover filled with feather...may be girlish, but i tell u its soft and very comtable...not to mention it keeps me warm @night lol
It is a pain in the ass.
So I did quite a bit of research this morning.
The LSJ has 8mm bolts in the intake accepting 18ft lbs.
The LAP and some of the others have 6mm bolts and only accepting 89 inch lbs (7.451 ft lbs).
So, I was near the limit of breaking the bolts. LOL.
Tonight when I go to work on it I will torque to 89 inch lbs and move on about my business.
Tonight was a good night for me... YESS finally.
The new washers were a little thicker and did not budge. Instead of the 89 inch lbs I did 10ft lbs. All seems well and the intake manifold is now bolted in its new home.
As far as wiring my intercooler... last night I put the ground wire where the alternator wire was moved to and the starter ground... all in one place.
I also mentioned yesterday we took the power wire up the starter cable and in that corrugated tubing to the fuse block. I drilled a really small hole (just enough to get 16 gauge wire in) the side of the fuse block bottom cover and ran the wire to the top of the fuse block.
In looking at the service manual, the 15 amp fuel pump fuse below the fuel pump relay is not energized until the fuel pump relay is... so I tapped into that fuse using a "add a circuit" They have an ATM or ATC type. Our fuses are the ATM type. I inserted this into the fuel pump fuse thingy and then added 2 10 amp fuses. I tested the pump tonight and it works fine. I got this at AutoZone tonight.
My tensioner bolt, alternator bracket and idler installed flawlessly. Very fast!! My tensioner pulley does just about rub on the side of the block where the lift bracket was, so that will be grinded off on Saturday.
As far as the washer pump wiring.... there is a corrugated tube running along the top of the radiator mounting panel and it goes from side to side... which looks like my fog lamp wires and all run to. I am thinking of running my washer wiring through there now as it dumps off right into the new washer bottle location.
If not, it looks like I can just wire tie more of the corrugated tubing to the existing (side by side) and run a whole new wiring setup... so no big deal.
I will take pics... but I was working in my garage and it is dark out... and even though my garage is well lit (can lighting) the pics probably wouldn't come out well.
Can take pics of my fuse block and all.


you need to cut a diagnal rectangle from the circle on the top right, leading to the center, ill post a pic of what i mean

either one of those will work, i was showing which way u can cut it, u can do the diagnal rectangle like GM build book states, or u can do the whole ouline as on the manifold, either one will work, also if you have a dremel u can dremel the part in between the hole and the other part in the center of the manifold...dremel it out to let the air flow better instead of letting the engine do it, thats optional though, im doing it to my lsj one
here's a little something is pent a good hour making, made this for you blown 2.2's wanting something for a backround etc, image worked on using Cs3, i did not go into extreme detail, but i believe it looks nice, i was not able to paint the blower or valve cover, well i could but i could only get a matte/flat color out of it, i was not able to get a shiny black blower with a shiny black valve cover, only a flat black blower and cover, so i decided not to save it

ON the intake you were suppose to take it from the bottom near the wheel well in to the engine bay. like put it threw the hole from the bottom and move the tube up threw the hole. cuz mine was a bitch to to get on
ill post vids in a sec, need to ssh into phone to get them
http://www.youtube.com/watch?v=1Ml0Vu2DDMc
http://www.youtube.com/watch?v=GmnTvPGhWBw
here's some vids
well time to put the car back together
ok just spent some time putting everything back together, and im pissed, i line the h/e perfectly center'd just like the radiator, well when i put the bumpr back on it wasnt center'd, not at all, its 1.5" offset to the right, ans the massive h/e required a "cutting sheer" mod...


you can rewire an 8 pin TB to accept a 6 pin connector, as long as you have the pigtail of the 8pin. The 8 pin connector has 2 high voltage and 2 low voltage reference wires. The 6 pin connector only has one of each, hence 2 less wires. You can split the 2 wires in a 6 pin TB to make 8 pins, or you can join the 2 similar wires of each pair together in an 8 pin connector to make 6 pins
____________
M8x1.25mm 130mm bolts x3 (I'd rather it be longer than shorter)
M8x1.25mm 110mm bolts x2 (for intake manifold)