Jn2
Full Access Member
- Joined
- Jul 19, 2009
- Posts
- 1,847
- Reaction score
- 1

Parts required to supercharge your 2.2
-Eaton m62/harrop tvs1320 supercharger
-LSJ intake manifold(m6x1.0 75mm x2)
-LSJ lower intake manifold bracket(m8x1.25 50mm bolts x2, m10x1.5 50mm bolt x1)
-LSJ alternator bracket(m8x1.25 130mm bolt x3)
-LSJ belt(stock pulley-3.0"pulley=stock belt, smaller than 3.0=stgII belt)
-LSJ belt tensionor
-LSJ idler pulley
-42lbs/hr fuel injectors or more
-injector harness(repin to stock harness)
-LSJ air intake
-LSJ intake manifold gasket
-m62 gasket
-extended upper radiator hose/LSJ upper hose(1.5" in/out)
-10ft of 3/4" hose
-a lot of 3/4" worm clamps
-a few 3/4" tees and elbows
-heat exchanger(s)
-filler neck/overflow tank
-bosch intercooler pump(from lighting/cobalt/ion is fine)
-intercooler pump bracket(m8x1.25" 40mm bolts x2, m8x1.25" 55mm x2)
-1gallon of dexcool
-1step colder spark plugs
-wideband gauge
-boost gauge
-trifecta tuning(all years)/LS2edit for 2007+
OPTIONAL/RECOMMENDED:
-aftermarket air intake
-Lsj/Ls4 throttle body(repin/rewire required)
-dual pass endplate
-full exhaust(1.75" primaries, 2.5" downpipe, 2.5" exhaust)
-solid tranny mounts/engine mount
-water wetter for IC system
-LSJ supercharger sensor(to plug hole on blower)
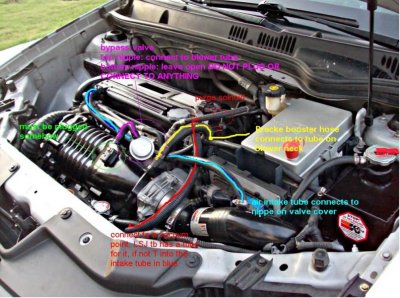
quick pics of most of the parts put together:


^^^thats how u mount ur stock MAP to the LSJ manifold, be sure to cut a hose and use it as agasket between the sensor and the manifold, take the hose, cut it to a rectangle, than poke a hole thru it, stick ur sensor thru the hole, place it in the manifold, and bolt it done, the hose will seal the rest of the hole and work as a perfect gasket


^^^be sure to cut ur LSJ gasket to match the one i have pictured...very important
places to some parts from:
zzperformance.com : good for intakes, header/dp, pulleys for blower, sc maintance items, and fuel injectors w/harness
frozenboost.com : good for all your water/air intercooling needs, everything form h/e's to dual pass fitting, slimmer fans, filler necks
smoothflowpulleys.com good for pulleys for your supercharger
turbotechracing.com good for your aftermarket needs: header/dp/catback exhaust, intakes, solid mounts, spark plugs
autozone good for a bendy upper rad hose, bolts/nuts, and other misc stuff thats cheaper to get locally
ebay :we all know what ebay is good for
Wiring diagram if you have a 8pin throttle body pigtail...

if the A-D confuses u, just follow the color, swap your wires so they look like what i have pictured...
***there are bolts and nuts not mentioned, but the main ones are covered, all bolts you will need will m8x1.25 in different lenght, the only ones that arent m8x1.25 are the throttle body and intake manifold ones....i recommend using 2 double ended studs w/nuts, and 2 flared bolts for bolting the sc to the manifold
***there is a procharger kit available thru speedmafia which is a bolt on kit...

Last edited:

